Figure: dependencies among the program's components
For this project, you're going to write a program that can read numbers in either base 10 (like we normally do) or base 25 (like hexadecimal, but using decimal digits and letters from A up to O). We will have two versions of our program, calc10 will work with inputs and outputs in base 10 and calc25 will work with base 25.
Both versions of the program will be able to evaluate arithmetic expressions involving the four basic operators, plus, minus, times and divide. Our program will print out the result, or, if there is an overflow or a divide-by-zero while evaluating the expression, it will have a way to detect and report that.
The following shows an execution of the calc10 program. After starting the program, the user enters an expression. The program reads the expression, evaluates it and reports the result
$ ./calc10
35 + 120 / 47 - 62 * 49 / 34
-52
The following shows an execution of the calc25 program instead. Just like the base 10 version of the program, the user enters an expression and then the program prints what it evaluates to. Below, the expression entered by the user is equivalent to the one above; it's just in base 25 rather than base 10. For example, the first number, 1A, is a base-25 representation of the decimal number 35. You can check the decimal value by adding up the value of the digits: 1 * 251 + 10 * 250 = 35.
$ ./calc25
1A + 4L / 1N - 2C * 1O / 19
-22
To help get you started, we're providing you with a test script and several test inputs and expected outputs. There's also a partial implementation of one of the header files you'll be using. See the Getting Started section for instructions on how to set up your development environment so that you can be sure to submit everything needed when you're done.
This project supports a number of our course objectives. See the Learning Outcomes section for a list.
You get to complete this project individually. If you're unsure of what's permitted, have a look at the academic integrity guidelines in the course syllabus.
The requirements section explains what your program is supposed to be able to do. The design section describes some rules for how you're going to build it. Be sure you follow these rules. It's not enough to just turn in a working program; your program has to follow the design constraints we've asked you to follow. This helps to make sure you get some practice with the parts of the language we want to make sure you've seen.
Requirements are a way of describing what a program is supposed to be able to do. In software development, writing down and discussing requirements is a way for developers and customers to agree on the details of a system's capabilities, often before coding has even begun. Here, we're trying to demonstrate good software development practice by writing down requirements for our program, before we start talking about how we're going to implement it.
The two versions of the program will be called calc10 and calc25. Like in the examples above, calc10 will be a version compiled to read input numbers in base 10 and write results in base 10. The calc25 version will read and write values in base 25 instead.
The calc programs will read a single line of text from standard input. The text will be an arithmetic expression consisting of numbers and the four basic arithmetic operators, +, -, * and /. The program is expected to respect the usual precedence of these operators, with * and / having higher precedence than + and -. For example, given the following expression as input, the program will multiply 2 and 4 before adding their product to 3. There is an opportunity to add support for parentheses for extra credit.
3 + 2 * 4The program should compute the value of the given expression and print it on a line by itself to standard output.
The program should be able to handle an arithmetic expression of arbitrary length. For example, it should be able to add up hundreds of individual numbers. The input expression is expected to end with a newline character, and the program should exit after reading the first input line (ignoring any input after the first line). This behavior will make the program easier to use interactively. The user doesn't have to signal the end-of-file condition to get the program to exit. It will automatically exit after the user enters a line.
Input and output numbers will be given in either base 10 or base 25, depending on the version of the program. The base 10 version will read and print numbers in base 10, like humans normally do, using decimal digits 0 .. 9.
The base 25 version of the program will use 0 ... 9 for the first 10 digit symbols. It will use capital letters A .. O for digit values from 10 .. 24. This is like what we do with hexadecimal; we're just using more letters to get all the way up to 25 different symbols. Using the letter O here is a little unfortunate, since it looks a lot like a zero. The terminal font should help us to distinguish the zero from the letter O; the zero will often be shown with a dot in the middle or a slash through it.
In base 25, the following would represent the (base 10) value, 6366. The A symbol is worth 10 * 252. The 4 is worth 4 * 251 and the G symbol is worth 16 * 250. Added together, these dive us 6366 (in base 10).
A4GThe calc programs support signed values. Putting a - in front of a value indicates that it is negative. For a negative value, the dash must occur at the start of the number, without any spaces between it and the rest of the number. Also, numbers can have at most one dash in front; for example, you can't give a positive number as "--3".
Internally, our program will represent values using signed long. So, it will really be representing values in binary, two's complement, no matter what base is being used for input and output. On the common platform, this will let us represent values from -9223372036854775808 (LONG_MIN) up to 9223372036854775807 (LONG_MAX).
An expression consists of one or more numbers with arithmetic operators (+, -, * and /) in between them. Each expression should be given on a single line, with a newline character (\n) at the end.
Input numbers and operators may be separated (and preceded and followed) by any amount of whitespace, including spaces, tab characters (\t), carriage returns (\r), vertical tabs (\v) and form feeds (\f). Normally, whitespace would include newline characters, but we're depending on newline to mark the end of an expression, so we won't permit it within an expression.
If the program ever gets a value that's outside the range of a signed long, it should terminate with an exit status of 100, without printing any output. This could happen if one of the input values is too large or if one of the computations while evaluating the expression yields a number that's too big (either as the final result of the expression or as one of the intermediate results).
If the expression includes an attempt to divide by zero, the program should terminate immediately with an exit status of 101.
If input is invalid, your program should terminate with an exit status of 102, without printing any output. Input numbers must consist only of legal symbols for the base. That's digits 0 ... 9 for the base 10 program and digits 0 .. 9 and letters A .. O for the base 25 version. Numbers may have a dash at the start indicating a negative value. Characters other than the four operator symbols and whitespace also can't occur between numbers, and the input expression must have a newline at the end. If the input doesn't satisfy these conditions, then it's invalid.
If you do the extra credit, then your program should also permit parentheses in the input. If you don't do the extra credit, you should consider an input expression to be invalid if it contains parentheses.
The program will be implemented using three components. Here's what they are responsible for:
operation.h / operation.c
This component provides functions for performing the four basic arithmetic operations on signed long values. They automatically detect overflow or divide-by-zero.
number.h / number10.c / number25.c
This component reads numeric values from input and writes results to output. It has two implementations, number10.c for numbers written in base 10 and number25.c for numbers written in base 25. It just has one header file since these two implementations both offer the same interface. We can use either one of these implementation files and the rest of the program will still operate the same.
calc.c
This is the top-level component, containing the main() function. With help from the other components, it is responsible for reading and evaluating the whole expression and printing the result.
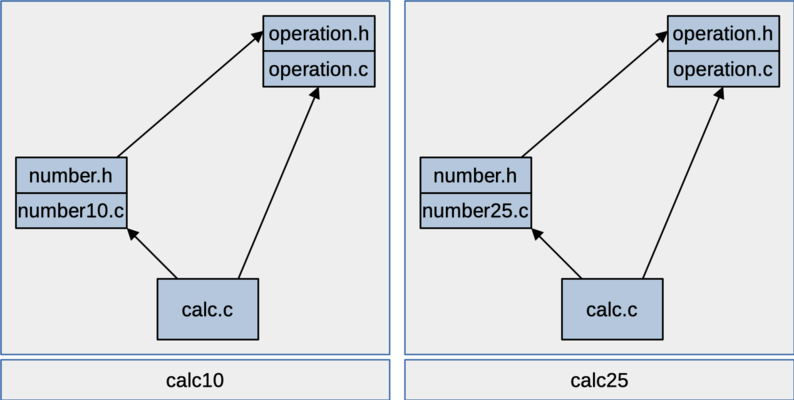
The following figure shows the dependency structure of our components. The figure on the left shows the calc10 program and the one on the right is the same figure for calc25. The only difference is which implementation file we're using for the number component. You can see we've tried to make sure there are no dependency cycles among the components. The operation component doesn't need to use either of the other two components. The number component can use operation, and the top-level, calc component will use both of the other two.
Figure: dependencies among the program's components
These two figures show how we're going to build the two different versions of our program. They will both have an operation component, a number component and a calc component. The base 10 version of the program is linked with the object file for number10.c, so it gets the versions of parseValue() and printValue() that are written for base 10. The base 25 version gets linked with the object file for number25.c, so it gets the version of these functions for base 25.
You can use as many functions as you want to solve this problem, but you'll need to implement and use at a few functions that we're asking you to create. Your operation.c component should have at least the following functions:
long plus( long a, long b )
This function adds the given parameters and returns the result. You wouldn't normally need a whole function to do this for you, but the real job of this function is to automatically detect overflow. If the result of the addition is outside the range for a signed long, the function will detects the overflow and terminate the program with the correct exit status.
long minus( long a, long b )
This function is like plus(). It subtracts b from a and detects when overflow occurs.
long times( long a, long b )
This function is like plus(). It multiplies the parameters and detects overflow.
long divide( long a, long b )
This function divides a by b and returns the result. It detects any attempt to divide by zero and terminates the program with the correct exits status when that happens. It also needs to detect one possible case of overflow during division.
The number10.c and number25.c implementation files will define the same functions. They should both should define at least the following three functions. The parseValue() and printValue() functions will be implemented differently between the two components, but the skipSpace() function will be identical. That means you will need to duplicate code for this function in two different implementation files. In general, duplicat ecode something to avoid, but we'll say it's OK for this part of the assignment.
int skipSpace()
This function reads characters from standard input. It keeps reading characters until it reaches a non-whitespace character or EOF. It returns the code for the first non-whitespace character it finds (or EOF). For this function, whitespace does not include the newline character. Code inside the number component or elsewhere in the program can use this to easily skip past whitespace within an expression.
long parseValue()
This function reads the next number from the input. In the number10.c file, it will read a number in base 10; the implementation in number25.c will try to read a number in base 25. If it detects errors in the input number, it terminates the program with the correct exit status.
void printValue( long val )
This function prints the given val to standard output. The implementation in number10.c will print the number in base 10, while the number25.c implementation will print it in base 25.
The calc.c component will contain main() and the following function.
static long parseTerm()In class, we talked about a couple of ways to detect overflow when adding or subtracting numbers in two's complement. For this program, you should detect overflow in plus() and minus() based on looking at the signs of the two operands vs the sign of the result. For example, if you add two positive numbers, the result should be positive. If you get a negative result, then an overflow must have occurred. There are some other cases you'll need to consider to catch all possible overflows for addition and subtraction. You should be able to figure out these other cases and implement them in your operation.c component.
Catching overflows in multiplication is a little more interesting. We can't just look at the signs of the operands vs. the sign of the result. Instead, we'll check to make sure the product will be in range before we even perform the multiply. Consider the following statement, where a, b and c are all signed long.
c = a * b;If a and b are both positive, then their product will be positive. If that product is larger than LONG_MAX, then we have an overflow. Before even multiplying a and b, we can figure out the largest value x such that x * b is less than or equal LONG_MAX. We just have to compute x = LONG_MAX / b. Integer division round down (toward zero), so, with x computed like this, x * b could be smaller than LONG_MAX. If LONG_MAX is evenly divisible by b, then x * b will be equal to LONG_MAX. Either way, x is the largest value that we can multiply by b without exceeding LONG_MAX. So, if a > x, then a is too large; a * b will overflow.
This gives us a way to test for overflow on multiplication when the two operands are both positive. As part of this project, you'll need to come up with similar tests for the three other cases, when either a or b or both are negative. Remember that LONG_MAX is the largest positive number that a signed long can store, but LONG_MIN is the largest negative value. You'll need to consider this when either a or b (but not both) are negative. Also, remember that division truncates for positive or negative values (it rounds toward zero).
Your top-level component, calc.c will be responsible for reading arithmetic expressions and evaluating them (with help from the other two components). An expression is a number, possibly followed by an operator and another number, possibly followed by another operator and number, and so on. If we didn't need to worry about precedence, we could just parse an expression with a while loop.
We will use an extra function to help handle precedence in our program. We will say a term is a sequence of one of more numbers with multiply and divide operators in between. A term could be just one number, like 35, or it could be a sequence of numbers with these higher-precedence operators in between, like 62 * 49 / 34. The function parseTerm() will be responsible for parsing a whole term from the input and returning the value it evaluates to. For a term like 35, it should just return 35, or, for a term like 62 * 49 / 34, it should return 89.
To parse an expression, with the right precedence, we will think of it as a sequence of one or more terms, with plus or minus operators in between. Your parsing code will call parseTerm() to parse each term, then you will look for a plus or minus operator to connect it to another term. The last term won't be followed by a plus or minus, so you will be able to tell when you've parsed the last term. The following figure shows how your code would parse the input shown at the start of the assignment. The parseTerm() function is called to parse the first term, then called again after each plus or minus operator to get subsequent terms. Inside parseTerm(), you parse a sequence of one or more numbers with the plus or minus operators in between.
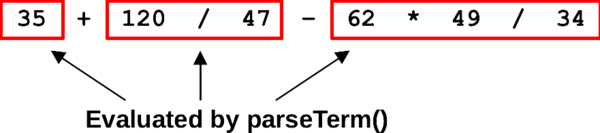
Figure: Parsing an expression with higher precedence for multiply and divide
Be sure to have a look at the ungetc() function described below. This can be helpful in writing your parsing code. It lets you effectively back up by a character if you read more input than you need right now.
Your number10.c and number25.c files will each implement functions for reading and writing numbers. For the implementations in number10.c, printing numbers will be easy. You can print them in base 10 using printf() with the "%ld" conversion specifier. For reading numbers in either base or for printing numbers in base 25, you will need to write your own parsing and printing code. The following describes how to read and print numbers in base 25. For reading them in base 10, you can implement a similar technique to your base-25 parsing code. It will be a little bit easier than the base 25 example, since numbers won't contain any letters.
Why can't you just read base 10 numbers using scanf()? Well, we could if we didn't have to detect overflow. The scanf() function doesn't provide a good way to detect overflow in numeric input. You can use scanf() temporarily, as you start developing your implementation. That will make the number10.c file really easy to write, but you will want to switch to your own number parsing code before you turn in the project.
To read numbers in base 25, we'll use a technique based on Horner's rule. It will make it easy to read numbers from left to right. The following pseudo-code describes how the algorithm works. You'll need to add code to handle negative values (with a dash character in front). You'll also need to add your own code to detect errors while reading and exit appropriately.
  // Value we've parsed so far.
  value = 0;

  // Get the next input character.
  ch = next_input_char();

  // Keep reading as long as we're seeing digits.
  while ( ch is a digit in base 25 ) {
    // Convert from ASCII code for the next digit into the value
    // of that digit.  For example 'A' -> 10 or '7' -> 7
    d = char_to_digit( ch );

    // Slide all digits we've read so far one place value to the
    // left.
    value = value * 25;

    // Add this digit as a new, low-order digit.
    value = value + d;

    // Get the next input character.
    ch = next_input_char();
  }

  // ch was one character past the end of the number.  Put it back on
  // the input stream so it's there for other code to parse (see notes
  // below about ungetc()).
  unget( ch );
There's a possibility of overflow as you're parsing a number. This could happen either while you're multiplying by 25 or adding in the new low-order digit. You could add code here to detect overflow, or you could just use the functions from your operation.c component to perform the multiply and the add; they already detect overflow and exit the program appropriately if it happens.
In class, we looked at a technique for converting between base 10 and binary. Your number25.c implementation will use a similar technique to print out results in base 25. Pseudo-code for this technique is shown below, where value is the value we're supposed to print.
  // While there are more digits to print.
  while ( value != 0 ) {
    // Get the next digit on the right.
    d = value % 25;

    // Convert it to a character, e.g, 13 -> 'D' or 3 -> '3'
    ch = digit_to_char( d );

    // Print out the next digit (note, this will give us the digits
    // backward).
    print( ch );

    // Slide remaining digits to the right.
    value = value / 25;
  }
You'll need to make some changes to this code to get it to work in you program. In particular, you'll need to:
Add support for negative numbers (e.g., printing a dash in front).
The code above won't print anything if value is zero. That's easy to fix by handling zero as a special case.
The code above will print the digits backward. It gets the low-order digit first and ends with the high-order digit. If we knew how to work with strings, this would be easy to fix. We could just save all the digits and then print them in reverse. Instead, we'll fix the digit ordering using recursion. You can implement the procedure above recursively instead of iteratively. On each recursive call, you can extract (but don't print) the low-order digit, make a recursive call to print the remaining, high-order digits, then print the low-order digit you extracted. This should give you the digits with the high-order one first.
If you just read the character, ch from standard input, you can call ungetc() to put that character back onto the input stream. This won't put another copy of the character back on the terminal or anything like that. It will just put it back in the input buffer for standard input, to be read again later.
During parsing, it can be convenient to put a character back onto a stream. For example, if you're reading a number from input, you'll need to read characters until you reach the end of the number. This generally requires you to read the next character past the end of the number itself. Other parts of your parsing code may be responsible for reading this next character and using it (e.g., if it's an operator like '+' or '*'). The ungetc() function lets you put this character back onto the stream so it can later be read by other parts of your program.
Calling ungetc() as follows will put the given character, ch back onto the standard input stream.
ungetc( ch, stdin );You should be able to complete this project without creating any global variables. The function parameters give each function everything it needs.
Be sure to avoid magic numbers in your source code. Use the preprocessor to give a meaningful name to all the important, non-obvious values you need to use.
Our calc programs are not required to support parentheses. They just evaluate a given expression with the usual precedence for operators. For up to 8 points of extra credit, you can add support for parentheses. With the extra credit, your program should be able to evaluate expressions like the following. Here, it will perform the addition and subtraction before multiplying the results.
( 5 + 8 ) * ( 7 - 2 )Like the other parts of the expression, parentheses can have whitespace before or after them. As usual, an expression inside parentheses can appear in place of any number in the input. The entire input expression could even be inside parentheses.
The starter has four sample inputs and expected output files for the extra credit option. These are named like input-ec-*-*.txt and expected-ec-*-*.txt. The input-ec-25-2.txt file is an error test. The parentheses don't match, so the program should termiante with an exit status of 102.
You get to implement your own Makefile for this project. We're expecting it to be called "Makefile", with a capital M at the start and no filename extension at the end. This Makefile will be a little more interesting than usual, since we'll be compiling two versions of our program, one for base 10 and the other for base 25.
Your Makefile should be smart enough to separately create each of the object files needed by your program. It should have a separate rule to create object file by compiling the corresponding implementation file. It will also have a rule to build each of the two executables. One rule will be for linking together calc.o, number10.o and operation.o to create the calc10 executable. The other will link together calc.o, number25.o and operation.o to create the calc25 executable. When it's creating an object file, your Makefile should use the usual compile-time flags, -Wall, -std=c99, and -g. When you're linking, you will need to use the -o flag to specify the name of the executable you want to create. You won't need any other flags for the linker. For example, you won't need the -lm flag since we won't be using the math library for this project.
From class, you'll remember that make includes default rules for building common types of targets. You can use these built-in rules for the compile steps if you want. If you do use the built-in rules, be sure to set up variables like CFLAGS so your code compiles with the options we need. Also, you will need to write your own gcc commands for the linking steps in your Makefile. The built-in rules won't work for this since the executable name doesn't match the names of your source files.
To use this Makefile, you can tell it the specific target you want it to build. For example, if you run it as follows, it will create the calc10 program, compiling any needed prerequisites first, then linking them together into an executable.
$ make calc10To get it to build the calc25 program, you can just run make with calc25 on the command line instead. The testing script runs make this way to build each version of you program before testing it.
The Makefile should also have a rule with the word clean as the target. This will let the user easily delete any temporary files that can be rebuilt the next time make is run (e.g., the object files, executables and any temporary output files).
A clean rule can look like the following. It doesn't have any prerequisites, so it's only run when it's explicitly specified on the command-line as a target. It doesn't actually build anything; it just runs a sequence of shell commands to clean up the project workspace. Your clean rule will look like the following. In the example below, we used the <tab> notation to remind you where the hard tabs need to go in a Makefile. Don't actually put <tab>; use a tab character instead. In your clean rule, replace things like all-your-object-files with a list of the object files that get built as part of your project.
clean:
<tab>rm -f all-your-object-files
<tab>rm -f your-executable-programs
<tab>rm -f any-temporary-output-files
<tab>rm -f anything-else-that-doesn't-need-to-go-in-your-repo
To use your clean target, type the following at the command line, but first be sure you have committed all of the files that you need to your github repo. If you make a mistake in this rule, you could accidentally delete some of your files. Committing them to your repo first can help make sure you don't lose anything important. You can always recover your files from your repository if something goes wrong.
$ make cleanYou may want to add a rule like the following one as the first rule in your Makefile. Remember that the first rule is the default rule, if you don't specify a particular target to build. This rule says if you're building all (the default target since it's the first rule), then you need to first build the calc10 and calc25 targets. This will get make to try to build both versions of your program whenever you just enter the make command.
all: calc10 calc25Your Makefile should correctly describe the project's dependencies, so targets can be rebuilt selectively, based on what source files have changed since the last time their target was built. The following figure tries to show how the various files in your project depend on each other. It illustrates the calc10 program, but a similar figure could be made for calc25.
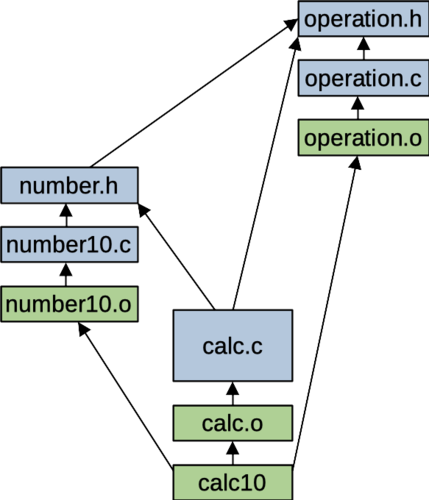
Figure: Dependency structure for source files and make targets
The arrows show where one file depends on another. The blue boxes represent source files and the green ones show targets that your Makefile knows how to build. If none of the targets have been built (e.g., if you just ran make clean), then your Makefile will have to rebuild all the targets. Running "make calc10" should produce output like the following. The order of the compile steps may be different, but you should see each of your implementation files being compiled to an object file, then you should see a gcc command for linking you object files into an executable.
$ make calc10
gcc -g -Wall -std=c99   -c -o calc.o calc.c
gcc -c -Wall -std=c99 -g number10.c -o number10.o
gcc -g -Wall -std=c99   -c -o operation.o operation.c
gcc calc.o number10.o operation.o -o calc10
After building your project once, make should be smart enough to avoid unnecessary steps on subsequent builds. If you try to run make again without changing anything, it should tell you there's nothing to rebuild:
$ make calc10
make: 'calc10' is up to date.
If you modify just some of your source file, the dependencies in your Makefile should let make figure out what targets need to be rebuilt. For example, if you change just the number10.c source file and then rebuild only the object file for number10 and the executable, calc10 have to be rebuilt. From the figure above, you can see that these are the only files that depend on this source file. You can use this by making a small edit to your number10.c file then saving it, or you can use the touch command to make the computer think the file has been modified without having to actually edit it.
$ make calc10
gcc -c -Wall -std=c99 -g number10.c -o number10.o
gcc calc.o number10.o operation.o -o calc10
However, if you change the header file, number.h, make will have to rebuild both the number10.o object file and the calc.o object file. The source files for both of these components include the number.h header. After rebuilding these two objects, it will have to link all the objects into an executable:
make calc10
gcc -g -Wall -std=c99   -c -o calc.o calc.c
gcc -c -Wall -std=c99 -g number10.c -o number10.o
gcc calc.o number10.o operation.o -o calc10The starter includes a test script, along with test input files and expected outputs for each version of the program. When we grade your programs, we'll test it with this script, along with a few other test inputs we're not giving you.
To run the automated test script, you should be able to enter the following commands. The first one sets the script to be executable; you probably just need to do this once for the first time you run it.
$ chmod +x test.sh # probably just need to do this once
$ ./test.sh
The test script will try to build both versions of your program using your Makefile. Then, it will see how they behave on all the provided test inputs described below. The test script is what's called a shell script. It contains the same kinds of command you type at the terminal when you're working on a Unix machine.
You probably won't pass all the tests the first time. In fact, until you have a working Makefile, you won't be able to use the test script at all.
If you want to compile one of your programs by hand, the following command should do the job. Here, we're compiling and linking three source files into an executable that uses base 10. Your Makefile should be smarter than this, compiling each source file individually and then linking all the resulting objects together, rather than compiling and linking everything all at once.
$ gcc -Wall -std=c99 -g calc.c number10.c operation.c -o calc10The following command is like the one above, but it tries to build he calc25 version of the program instead.
$ gcc -Wall -std=c99 -g calc.c number25.c operation.c -o calc25To run your program, you can do something like the following. The test script prints out how it's running your program for each test case, so this should make it easy to check on individual test cases you're having trouble with. The following commands run the calc10 program with input read from input-10-08.txt and with output written to the file, output.txt. Then, we check the exit status to make sure the program exited successfully (it should for this particular test case). Finally, we use diff to make sure the output we got looks exactly like the expected output for test case 8.
$ ./calc10 < input-10-08.txt > output.txt
$ echo $?
0
$ diff output.txt expected-10-08.txt
If your program generated the correct output, diff shouldn't report anything. If your output isn't exactly right, diff will tell you where it sees differences.
With the starter, we're providing a number of test inputs for trying out your programs. Some are for the base 10 version of the program and some are for the base 25 version. The automated test script, test.sh uses your Makefile to build both versions of your program. Then, it runs it on the provided test cases. The following tests are for calc10. Input files for these tests are named like input-10-*.txt and the expected output files are named expected-10-*.txt.
Read the number 1 from input and then report it as the result.
Adding two single-digit numbers, without any extra space.
A subtraction problem with some extra space.
A sequence of add and subtract operations with various three-digit positive and negative values.
Multiplying two numbers. This input has some extra characters after the first line. This isn't an error; it should be ignored by the program. We only care about input up to the first newline character.
A division problem with a lot of extra space.
Several multiply and division operations including positive and negative numbers.
An expression including all four operations. This is the example shown at the start of the assignment. You will need to have precedence working to pass this test.
A multiplication problem, one that's too large for an int, but within the capacity of a long.
A division problem, without any spaces between the operator and operands (which is OK).
This test adds the largest negative value and the largest positive values.
This is an error test, it has an overflow in an addition operation.
This is an error test. it includes an invalid expression, with two operators in a row.
This is an error test. It includes a divide-by-zero.
The following tests are provided for the calc25 version of the program. For these tests, the input files are named like input-25-*.txt and the expected output files are named expected-25-*.txt.
This reads the number 1 from input and reports it as the result.
This reads the number OOO (that's three letter O characters, the largest three-digit number we can input) and then adds 1 to it.
This does some addition and subtraction operations on positive and negative numbers.
An expression including all four operations. This is the base 25 example shown at the start of the assignment.
A problem that evaluates to zero.
This test adds up three numbers to get the largest positive number that can be stored in a signed long.
This test multiplies two numbers to get the largest negative number a signed long can hold.
This is an error test. it includes an input number with an invalid digit.
This is an error test. One of the input numbers is too large to fit in a signed long.
This is an error test. It multiplies two negative numbers to get a positive number that's too large to represent.
This is an error test. There's a symbol in between two numbers that isn't a valid operator.
Keep in mind, when we're grading your programs, we'll test them on these tests and on a few other tests that we're not providing. This is a good reason to think about possible tests or inputs that aren't done by the test.sh program.
The grade for your project will depend mostly on how well your code functions on test cases. We'll also expect your code to compile cleanly, we'll expect it to to follow the style guide and the expected design, and we'll expect a working Makefile.
Working Makefile, including dependencies and a make clean rule: 10 points
Compiling cleanly on the common platform: 10 points
Correct behavior on all test cases: 80 points
Source code follows the style guide: 20 points
Support for parentheses: 8 extra credit points
To get started on this project, you'll need to clone your NCSU github repo and unpack the given starter into the p2 directory of your repo. You'll submit by committing files to your repo and pushing the changes back up to the NCSU github.
Everyone in CSC 230 has been assigned their own NCSU GitHub repository to be used during the semester. It already has subdirectories (mostly empty) for working on each of the remaining projects. How do do you figure out what repo you've been assigned? Use a web browser to visit github.ncsu.edu. After authenticating, you should see a drop-down menu over in the upper-left, probably with your unity ID on it. Select "engr-csc230-spring2022" from this drop-down and you should see a repo named something like "engr-csc230-spring2022/unity-id" in the box labeled Repositories over on the left. This is your repo for submitting projects.
I've had some students in the past who do not see the organization name, "engr-csc230-spring2022" in their drop-down menu. I'm not sure why that happened, but when they chose "Manage organizations" near the bottom of this drop-down, it took them to a list of all their repos, and that list did include "engr-csc230-spring2022". Clicking on the organization name from there took them to a page that listed their repo. If you're having this problem, try the "Manage organizations" link.
You will need to start by cloning this repository to a place where you'd like to work, say a subdirectory in your AFS file space. You should be able to do this with the following command (where unity-id is your unity ID, just like it appears in your repo name):
$ git clone https://unity-id@github.ncsu.edu/engr-csc230-spring2022/unity-id.gitThis will create a directory with your repo's name. If you cd into the directory, you should see directories for each of the projects for the class. You'll want to do your development for this assignment right under the p2 directory. That's where we'll expect to find your project files when we're grading.
You will need to copy and unpack the project 2 starter. We're providing this file as a compressed tar archive, starter2.tgz. You can get a copy of the starter by using the link in this document, or you can use the following curl command to download it from your shell prompt.
$ curl -O https://www.csc2.ncsu.edu/courses/csc230/proj/p2/starter2.tgzTemporarily, put your copy of the starter in the p2 directory of your cloned repo. Then, you should be able to unpack it with the following command:
$ tar xzvpf starter2.tgzOnce you start working on the project, be sure you don't accidentally commit the starter archive to your repo (that would be an example of an extraneous file that doesn't need to be there). After you've successfully unpacked it, you may want to delete the starter from your p2 directory, or move it out of your repo.
$ rm starter2.tgzIf you've set up your repository properly, pushing your changes to your assigned CSC 230 repository should be all that's required for submission. When you're done, we're expecting your repo to contain the following files. You can use the web interface on github.ncsu.edu to confirm that the right versions of all your files made it.
calc.c : Top-level component for your calculator program.number10.c / number25.c / number.h : Implementation and header file for the component that reads and writes numbers in the chosen base.operation.c / operation.h : Implementation and header file for the component that performs arithmetic operations.Makefile : Makefile for efficiently building both versions of your program, calc10 and calc25.input-10-*.txt : Test input files for the base 10 version of the program, provided with the starter.input-25-*.txt : Test input files for the base 25 version of the program, provided with the starter.expected-10-*.txt : Expected image output files for the base 10 version of the program, provided with the starter.expected-25-*.txt : Expected image output files for the base 25 version of the program, provided with the starter.test.sh : test script, provided with the starter..gitignore : a file for this project, telling git some files to not commit to the repo.To submit your solution, you'll need to first commit your changes to your local, cloned copy of your repository. First, you need to add any new files you've created to the index. Running the following command will stage the current versions of a file in the index. Just replace the some-file-name with the name of the new file you want commit. You only need to do this once for each new file. The -am option used with the commit below will tell git to automatically commit modified files that are already being tracked.
$ git add some-file-nameWhen you're adding new files to your repo, you can use the shell wildcard character to match multiple, similar filenames. For example, the following will add all files ending with a .c extension to your repo.
$ git add *.cWhen you start your project, don't forget to add the .gitignore file to your repo. Since its name starts with a period, it's considered a hidden file. Commands like ls won't show this file automatically, so it might be easy to forget.
$ git add .gitignoreBefore you commit, you may want to run the git status command. This will report on any files you are about to commit, along with other modified files that haven't been added to the index yet.
$ git statusOnce you're ready to commit, run the following command to commit changes to your local repository. The -am option tells git to automatically commit any tracked files that have been modified (that's the a part of the option) and that you want to give a commit message right on the command line instead of starting up a text editor to write it (that's the m part of the option).
$ git commit -am "<a meaningful message about what you're committing>"Beware, you haven't actually submitted anything for grading yet; you've just put these changes in your local git repo. To push changes up to your repo on github.ncsu.edu, you need to use the push command:
$ git pushYou should plan to commit and push often as you develop your project, whenever you finish making a significant change to your work. This will help to show that you're working on the project. Whenever you've made a set of changes you're happy with, you can run the following to update your submission.
$ git add any-new-files
$ git status
$ git commit -am "<a meaningful message about what you're committing>"
$ git pushBe careful not to commit files that don't need to be part of your repo. Temporary files or files that can be easily re-generated will just take up space and obscure what's really changing as you modify your source code. And, the NCSU github site puts a file size limit on what you can push to your repo. Adding files you don't really need could create a problem for you later.
The .gitignore file helps with this, but it's always a good idea to check with git status before you commit, to make sure you're getting what you expect.
We have created a Jenkins build job for your project. Right now, it's only available from on campus, so if you want to check your Jenkins results from off-campus, you'll need to VPN into a campus address first. If you've never used VPN before, you'll find instructions for setting it up and connecting at: https://oit.ncsu.edu/campus-it/campus-data-network/vpn/. Follow the instructions for your type of system and get connected to the campus network. It will take a little bit of work to get this configured, but it will pay off in later classes if you already know how to use VPN. We'll see about making our Jenkins system available from off campus, so you may not need to use VPN on future assignments.
Jenkins is a continuous integration server that is used by industry to automatically build and test applications as they are being developed. We'll be doing the same thing with your project as you push changes to the NCSU github. This will provide early feedback on the quality of your work and your progress toward completing the assignment.
The Jenkins job associated with your GitHub repository will poll GitHub every two minutes for changes. After you have pushed code to GitHub, Jenkins will notice the change and automatically start a build process on your code. The following actions will occur:
Jenkins will record the results of each execution. To obtain your Jenkins feedback, do the following tasks (remember, after a push, you may have to wait a couple of minutes for the latest results to appear):
Be sure to follow the style guidelines and make sure your program compiles cleanly on the common platform with the required compile options. If you have your program producing the right output, it should be easy to clean up little problems with style or warnings from the compiler.
Be sure your files are named correctly, including capitalization. We'll have to charge you a few points if you submit something with the wrong name, and we have to rename it to evaluate your work.
We'll test your submission with a few extra test cases when we're grading it. Maybe try to think about sneaky test cases we might try, like behaviors that are described in this write-up but not actually tested in any of the provided test cases. You might be able to write up a simple test case to try these out yourself.
There is a 24 hour window for late submissions. Use this if you need to, but try to keep all your points if you can. Getting started early can help you avoid this penalty.
The syllabus lists a number of learning outcomes for this course. This assignment is intended to support several of theses:
Write small to medium C programs having several separately-compiled modules.
Explain what happens during preprocessing, lexical analysis, parsing, code generation, code optimization, linking, and execution. Explain the function and organization of relevant, intermediate formats, including pre-processor expanded source code, object files and executables. Compare and contrast the build and execute behavior between C and Java.
Identify errors that can occur during various compilation phases, identify relevant error messages and warnings, and appropriately correct these errors.
Correctly identify error messages and warnings from the preprocessor, compiler, and linker, and avoid them.
Find and eliminate runtime errors using a combination of logic, language understanding, trace printout, and gdb or a similar command-line debugger.
Interpret and explain data types, conversions between data types, and the possibility of overflow and underflow.
Explain, inspect, and implement programs using structures such as enumerated types, unions, and constants and arithmetic, logical, relational, assignment, and bitwise operators.
Add and subtract unsigned and signed, two's complement binary integers and convert among bases 2, 10 and 16.
Trace and reason about variables and their scope in a single function, across multiple functions, and across multiple modules.
Use the C preprocessor to control tracing of programs, compilation for different systems, and write simple macros.
Write, debug, and modify programs using library utilities, including, but not limited to assert, the math library, the string library, random number generation, variable number of parameters, standard I/O, and file I/O.
Use simple command-line tools to design, document, debug, and maintain their programs.
Use an automatic packaging tool, such as make or ant, to distribute and maintain software that has multiple compilation units.
Use a version control tool, such as subversion (svn) or Git, to track changes and do parallel development of software.
Distinguish key elements of the syntax (what's legal), semantics (what does it do), and pragmatics (how is it used) of a programming language.